
How to React on Rails
1st March 2019Being a Javascript developer and, more specific, using React as my main Front End Framework, one of the most common phrases that I hear when I join a project is “Let’s use React!”.

Even though React is really useful in lots of cases, it shouldn’t be your first option when developing your Front End.
However, if you are one of those people that wants to include this awesome technology in your already amazing application, you can do it without a lot of troubles and keep most of the logic you already have and just include React in those small parts that really needs it and let it bring those shines and sparkles that everyone talks about.
Honestly, start using React on you Rails app is like a walk in the park, however, before anything else and for this approach, we will need to have at least Rails 5.1, since it will allows us to use webpacker within our App and make it easier to include React.
With these small things already considered, the first thing we want to do is include two small gems into our gemfile:
gem 'webpacker'
gem 'react-rails'
This will add webpacker to our project, that lets us use the Javascript pre-procesor and webpack into our application. Also,react-rails, the one responsible for easy integration with React.
After adding these gems, we’ll need to run a few extra commands:
$ bundle install
$ rails webpacker:install
$ rails webpacker:install:react
$ rails generate react:install
Running this will create in your applications a few files and folders, being these the most important:
The folder where we’ll keep our React components
app/javascript/components
The configuration for react-rails that can be found on app/javascript/packs/application.js
We need one more little thing in our Rails app before starting to create our React components and that is to include the main entry point of all the code we’ll write for React. We are going to add a small line in the layout that will call our components:
<!-- application.html.erb in Head tag below turbolinks -->
<%= javascript_pack_tag 'application' %>
That’s it! That’s all you need to setup on you Rails app, easier than understanding Javascript’s this.
From this point all that’s left is write our first React component.
You can create it the old way or use one of the commands available:
$ rails g react:component YourReactComponent
This will auto generate a React component in the /components folder previously mentioned.
Now it’s time to create our first React component. In my case I made a simple Rails app to post Stories and as in most of our Apps, I have a list of all of them, so the first component that I”ll create is my StoriesList component. You can create it with the command already discussed or make it yourself:
$rails g react:component StoriesList
The result of this will be a file called StoriesList.js under the /component folder that looks like this:
import PropTypes from "prop-types";
class StoriesList extends React.Component {
  render () {
    return (
      <React.Fragment>
      </React.Fragment>
    );
  }
}
export default StoriesList;
With this, you can now easily call this component within any Rail’s view and to do it simply call it with a single line:
<%= react_component("StoriesList", { stories: @stories}) %>
The first parameter of this command is the exact name of the component we want to mount into our view. The second one is a hash with all the parameters we want to being sent over to our React component, in this case, our stories.
If we go over to our React component and do a console log of our component’s props just before the return of the render, we’ll see that we are receiving them.
  render () {
    console.log(this.props);
    return (
      <React.Fragment>
      </React.Fragment>
    );
  }
}
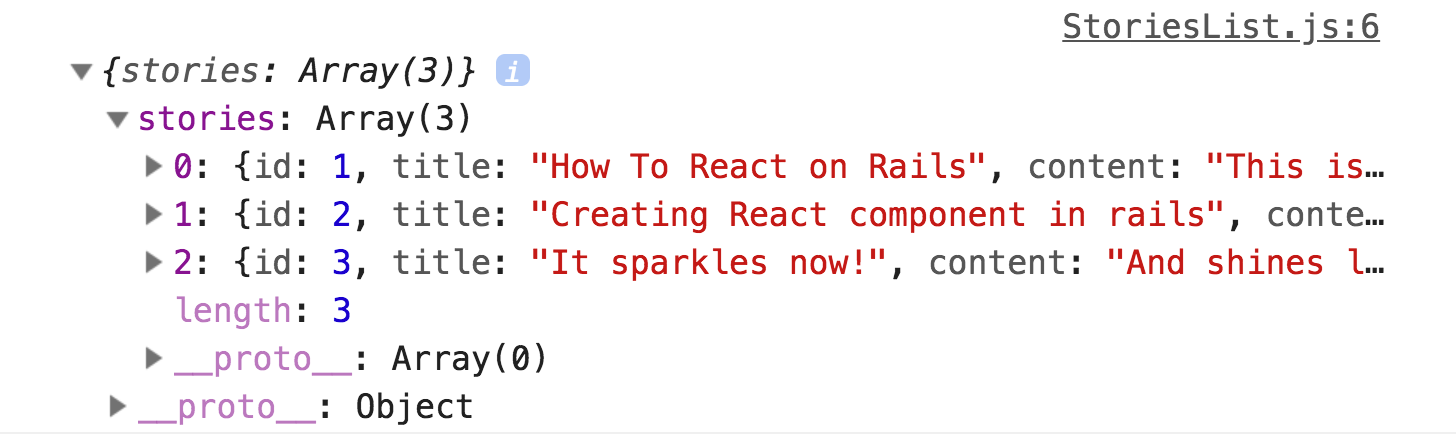
Our component will receive them as props and we’ll have them available as any other regular props. From this point we can keep working as a regular React component, so we’ll create just a simple list of our stories in our component:
import React from "react";
class StoriesList extends React.Component {
  render () {
    const { stories } = this.props;
    return (
      <React.Fragment>
        <h1>List made with React</h1>
        <div className="stories">
          { stories.map(story => {
            return <Story key={story.title} story={story} />;
          })}
        </div>
      </React.Fragment>
    );
  }
}
const Story = ({story}) => {
  return (
    <div className="story">
      <img src={story.picture} />
      <div className="story-content">
        <h3>{story.title}</h3>
        {story.content}
      </div>
    </div>
  );
}
export default StoriesList;
// stories.scss
body {
  background: #eaeaea;
}
.stories {
  display: flex;
  width: 100%;
  flex-wrap: wrap;
  .story {
    border-radius: 5px;
    overflow: hidden;
    background: #FFF;
    width: calc(50% - 30px);
    margin: 0 5px;
    margin-bottom: 15px;
    img {
      width: 100%;
      object-fit: cover;
      height: 200px;
    }
    .story-content {
      padding: 10px;
    }
  }
}
The stories.scss was generated as an empty file when we ran the command to create our component and it’s located under
/assets/stylesheets/stories.scss .
With this, our Rails view should looks something like this:
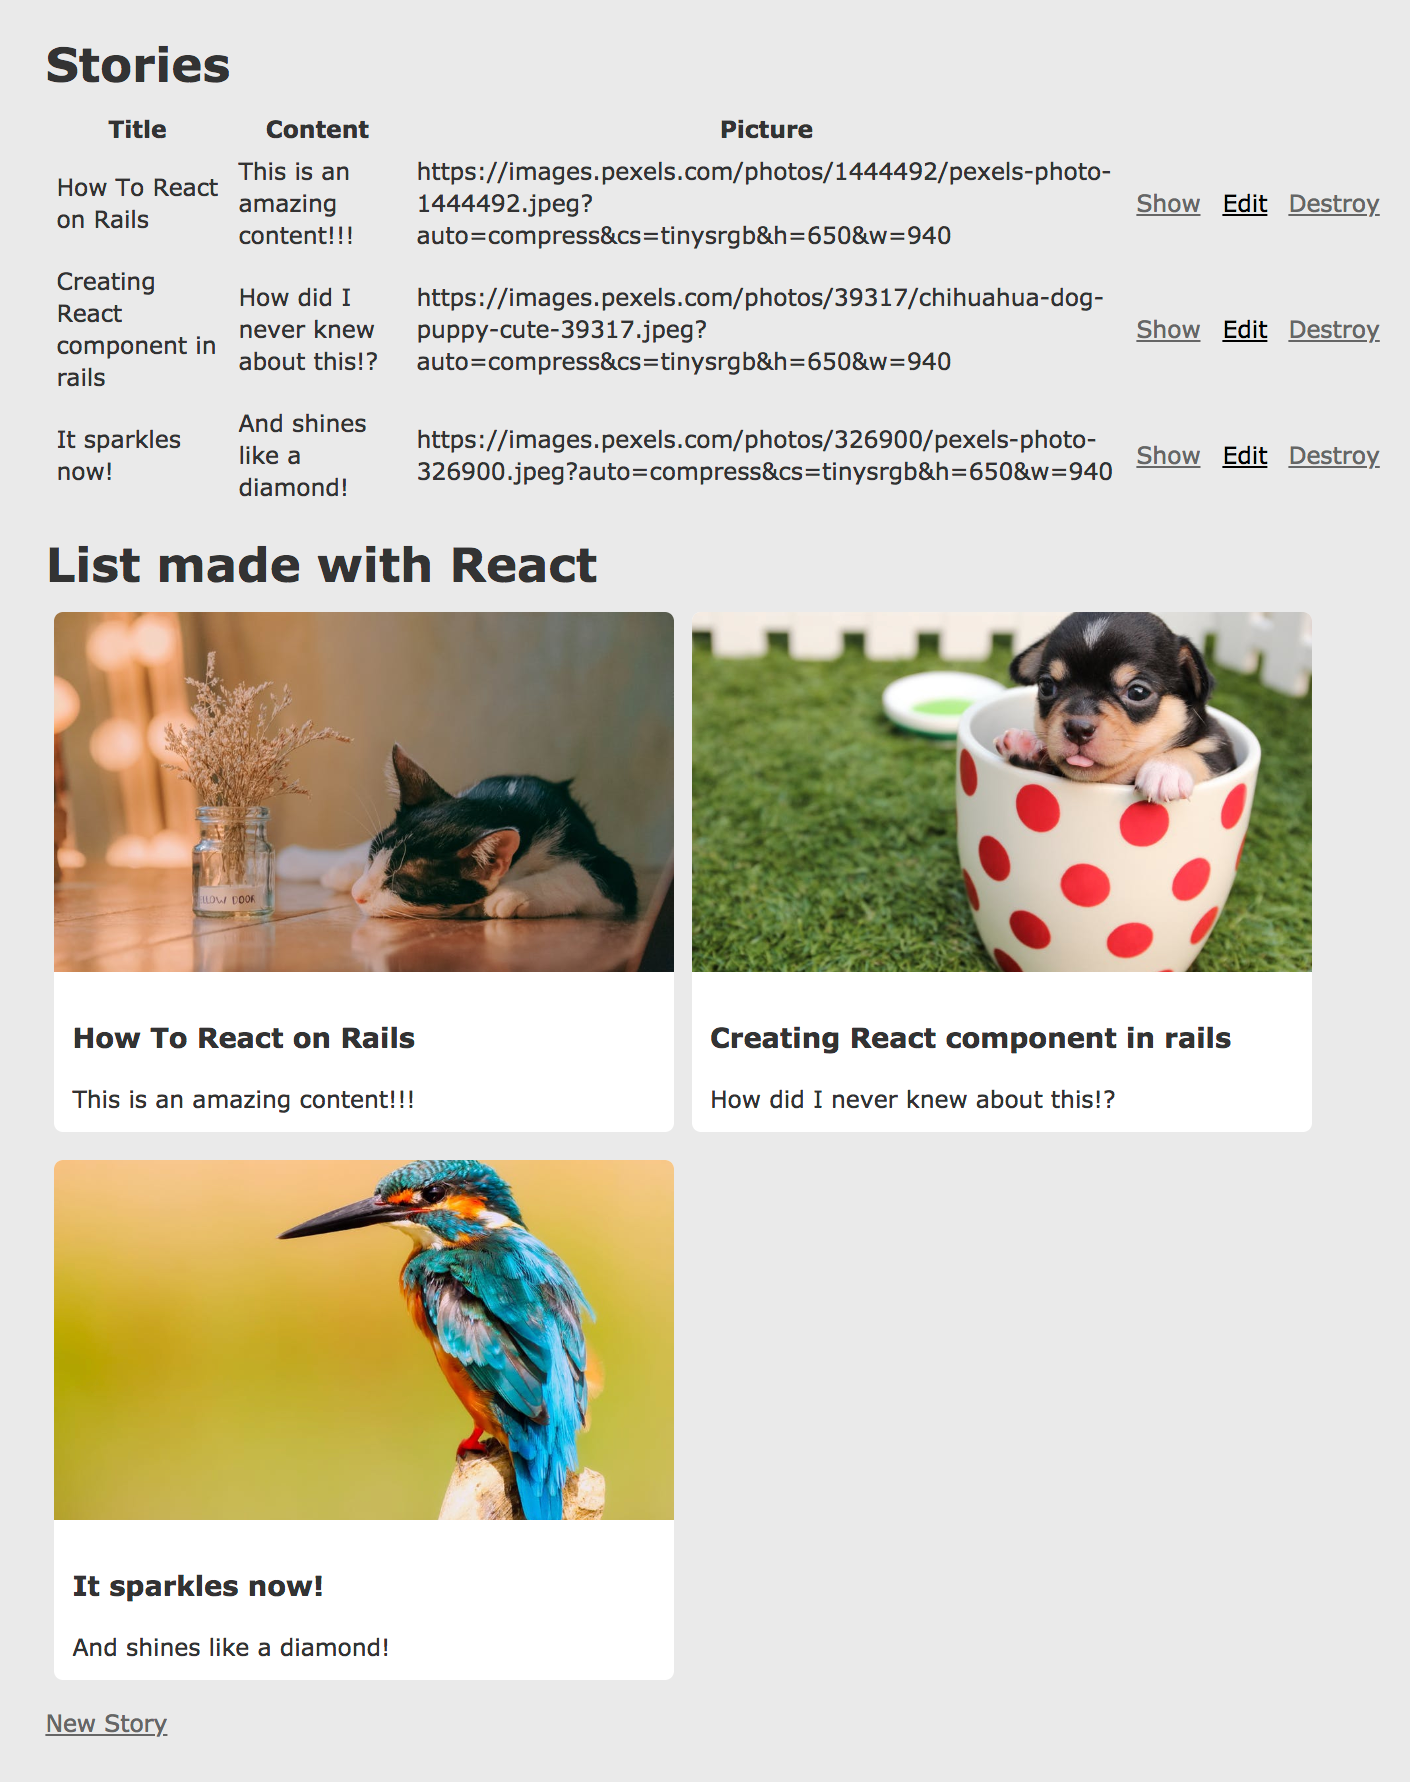
The list on top is the one generated by Rails’ scaffold and the one below is the one we just created with React.
At this point, everything else is just a matter of keep creating our components and render them wherever we need them.
As you can see, with the use of webpacker and react-rails gems, integrating React into our applications is super easy and effortlessly.
The next thing would be to create and render our components into specific divs within our app, but that’s for another occasion.
Don’t hesitate and try it, experiment with it and create awesome React components now that you have the power!

View Comments