
Setup node project with express, typescript and test from scratch
25th February 2022Starting a project from scratch is a very interesting experience, it's something that you will certainly do at some point in time and it’s worth it to start digging into it by yourself because you don't know whether if the next project is already started or if you'll have to work alone. But most importantly, it's a good way to get experience in order to grow as a developer. Besides that, a well built project from the beginning is easier to understand, maintain, and will help you avoid a lot of problems in the future.
Here we'll see how to setup a node API using express along with typescript including ESLint and Prettier to enforce code style, Husky and lint-staged to review our commits in addition to Mocha and Chai to write tests.
Project setup
First of all we're going to create a folder called my-project (you can choose the name you like), and move into it.
mkdir my-project
cd my-project
Then, we'll initialize a new project with a package.json:
npm init -y
# -y automatically answers yes to any prompts that npm might print in the console
Once we have our package.json, we'll install the following dependencies:
npm i -S express
npm i -D typescript eslint@7.32 prettier husky ts-node tsconfig-paths eslint-config-prettier lint-staged eslint-plugin-prettier eslint-import-resolver-typescript @types/express nodemon
# -S shorcut for --save, -D shorcut for --save-dev
Description:
- Typescript: This one allow us to use typescript in our project.
- Express: A Node.js framework, is going to be the main tool to build our API.
- ESLint: Is a utility who helps us to find and fix errors in our code. Due to the fact that JavaScript is a loosely-typed language there is more probability we introduce errors. In this case we're installing the 7.32 version instead of the latest (8.1.0) because is the latest compatible version for Airbnb style guide, which is the one that I prefer.
- @types/express: This package contains type definitions for Express.
- eslint-import-resolver-typescript: This library allow us to resolve imports from TypeScript.
- Prettier: A formatter for our code, which helps us to follow a certain code style.
- ts-node: Is a TypeScript execution engine for Node.js, it JIT (just in time) transforms TypeScript code to JavaScript allowing us to use TypeScript without pre-compiling our code and includes other bunch of useful features.
- tsconfig-paths: TypeScript accepts arbitrary paths in our tsconfig.json which can replace relative routes in our code, however if we try to run our files with node or ts-node, the modules won't be found, this package helps us to load those modules.
- eslint-config-prettier: Turns off all the unnecessary rules or the ones that might conflict with Prettier.
- Husky: Is a tool which help us to run git hooks in order to improve our commits and git processes.
- lint-staged: It help us to run linters in our staged files (git).
- Eslint-plugin-prettier: Extension to add prettier linting.
- nodemon: Nodemon is a tool which allow us to restart our server whenever we do a change in our code.
Now we're going to set up ESLint with the next command:
npx eslint --init
ESLint will ask for information of how we want to use it, in this case what we want is:
- Enforce code style.
- Use import/export modules.
- Use TypeScript, run in node.
- Use an already existing guide (I chose airbnb).
- The type of file in which we'll add our rules, I chose JavaScript but it can be the format you prefer.
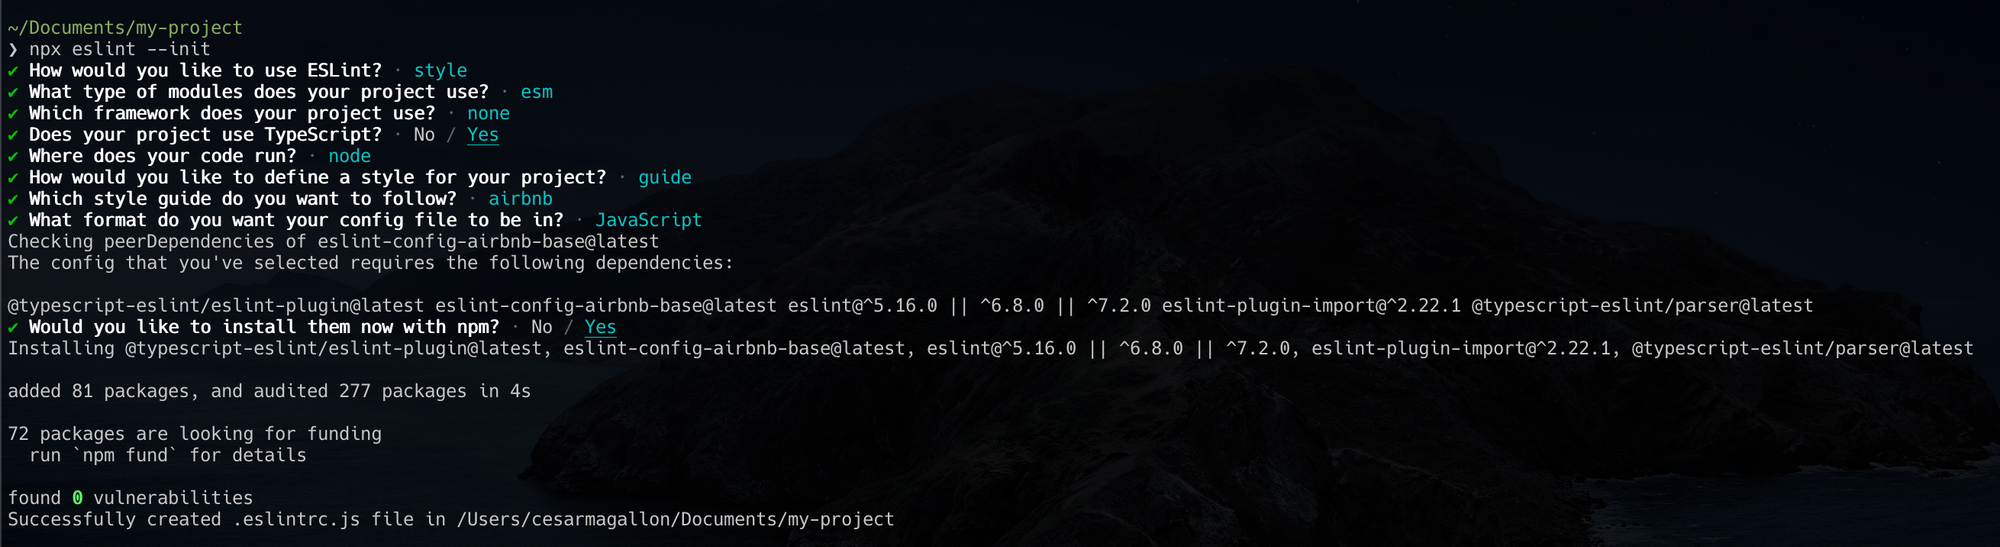
Finally it will ask permissions to install required dependencies according to your selections, should look something like below:
Your .eslintrc.js file should look something like this:
module.exports = {
  env: {
    es2021: true,
    node: true,
  },
  extends: [
    'airbnb-base',
  ],
  parser: '@typescript-eslint/parser',
  parserOptions: {
    ecmaVersion: 12,
    sourceType: 'module',
  },
  plugins: [
    '@typescript-eslint',
  ],
  rules: {
  },
};
Now we'll create a tsconfig.json file using the following command:
npx tsc --init
It will create a sample json file with a lot of options that we can apply, but for simplicity lets add just the following:
{
  "compilerOptions": {
    "allowJs": true, /* Allows javascript files to be part of our code */
    "esModuleInterop": true, /* Emit additional JavaScript to ease support for importing CommonJS modules. This enables `allowSyntheticDefaultImports` for type compatibility */
    "baseUrl": "./src", /* Specifies the base directory to resolve non-relative module names */
    "paths": { /* This one specifies a set of entries to re-map imports */
      "~/*": ["./*"]
    },
    "module": "commonjs", /* Specifies which module code is generated */
    "target": "es5", /* Sets the javascript version of the emitted typescript */
    "lib": ["es2021"], /* Specify a set of bundled library declaration files that describe the target runtime environment */
    "outDir": "build", /* Speficies the folder for the emitted code */
    "strict": true, /* Enables all the strict type-checking options */
    "noImplicitAny": false, /* Enables errors with expressions using 'any' */
    "resolveJsonModule": true, /* Enables importing json files */
    "moduleResolution": "node", /* Specifies how typescript looks up a file for a given module */
    "forceConsistentCasingInFileNames": true /* Ensure that casing is okay in imports */
  },
  "compileOnSave": true, /* Enables compile on save for this project */
  "include": [ /* Specifies the files which will be compiled */
    "src/**/*"
  ],
  "exclude": [ /* Speficies the files which will be excluded from the build */
    "node_modules"
  ]
}Now that we have establish the rules in our TSConfig, we'll move to our eslintrc.js file, here we'll add a couple of basic rules:
module.exports = {
  env: {
    es2021: true,
    node: true,
  },
  extends: [
    'airbnb-base',
    'plugin:@typescript-eslint/recommended',
    'prettier'
  ],
  parser: '@typescript-eslint/parser',
  parserOptions: {
    ecmaVersion: 12,
    sourceType: 'module',
  },
  plugins: [
    '@typescript-eslint',
    'prettier'
  ],
  settings: {
    'import/parsers': {
      '@typescript-eslint/parser': ['.ts']
    },
    'import/resolver': {
      typescript: {
        alwaysTryTypes: true,
        project: './tsconfig.json'
      }
    }
  },
  rules: {
    '@typescript-eslint/explicit-module-boundary-types': ['error'],
    'semi': ['error', 'never'],
    'arrow-parens': ['error', 'as-needed'],
    'no-trailing-spaces': 'error',
    'import/extensions': 'off',
    'max-len': [
      'error',
      {
        'code': 100,
        'tabWidth': 2,
        'ignoreComments': true,
        'ignoreStrings': true
      }
    ],
    'import/no-extraneous-dependencies': ["error", { "devDependencies": true }],
    "@typescript-eslint/no-explicit-any": "off"
  },
};
Basically the extends allow us to inherit rules of the specified plugins. In this case, we're adding the ones for TypeScript, Prettier and the ESLint. Prettier and TypeScript plugins need to be specified in the plugins key.
Then we have the settings key, here we'll add import/parsers and import/resolver. With the import/parsers we’re specifying that every .ts file will use the @typescript-eslint/parser, and under import/resolver we're telling TypeScript to always look for the types under the <root>@types folder and use the tsconfig.json configurations like customized paths or rules. At the end we have the rules key, where we will add some rules for the ESLint utility.
With ESLint configured, we'll proceed to create a src folder and a app.ts file:
mkdir src
touch src/app.ts
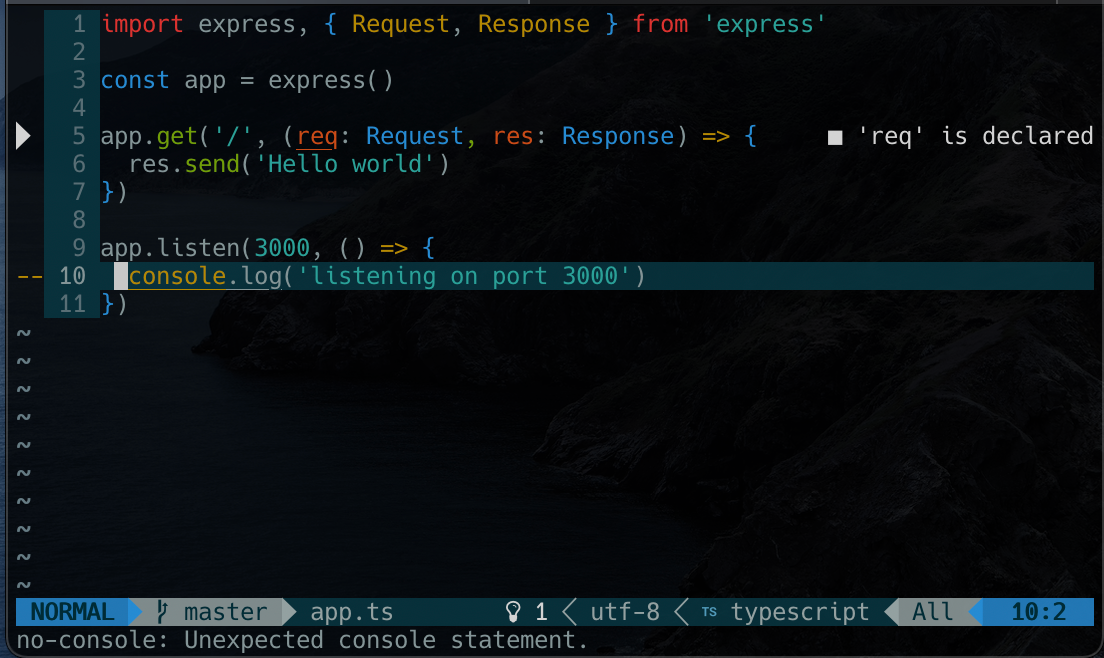
In app.ts we’re going to initialize our Express server, because we have ESLint configured we can now see our linter suggestions:
To avoid linter validations in the wrong files, we're going to create a .eslintignore file adding the node_modules folder and the build folder (compiled TypeScript code folder):
node_modules
build
In order to compile and run our ts code we're going to create three scripts, start, dev and build. start is the one that will be executed by the server in case of a deployment (not covered in this blog), dev for our normal development and build to compile our TypeScript code, first, we'll create a nodemon.json file with the next options:
{
  "watch": ["src"], // Files watched by nodemon
  "ext": "js, ts, json", // "extensions "
  "ignore": ["node_modules"], // files to ignore
  "exec": "ts-node -r tsconfig-paths/register src/app.ts" // instructions to execute the selected files
}
Then we'll create a file called bootstrap.js, which is going to help us with resolving the paths for our TypeScript files (because we're adding custom paths). It contains the following:
const path = require('path')
const tsConfigPaths = require('tsconfig-paths')

const tsConfig = require('./tsconfig.json')

const baseUrl = path.join(__dirname, 'build') // This will get the absolute path for the build folder

tsConfigPaths.register({
  baseUrl, // We're setting the base url
  paths: tsConfig.compilerOptions.paths // Here we're calling for the paths in our tsconfig.json
})
In order to use our TypeScript configuration in our test, we're going to create a tsconfig.build.json so we can denote which files to use for our normal development and for our builds. TypeScript will take our tsconfig.build.json excluding unnecessary files:
{
  "extends": "./tsconfig.json",
  "exclude": ["node_modules", "src/test/**/*.ts"]
}
Finally, we'll add the following scripts to our package.json:
{
  ...,
  "scripts": {
    ...,
    "dev": "nodemon",
    "start": "node -r ./bootstrap.js build/app.js",
    "build": "tsc --build tsconfig.build.json"
  }
}
If we run dev, it will execute the app.ts file in our src folder with nodemon, build will create a build folder in the root of our project with our compiled Typescript code, and start will execute the app.js compiled file in our build folder.
Prettier
To setup Prettier we're going to create a .prettierrc file. Here we'll add some style rules:
{
  "semi": false,
  "singleQuote": true,
  "printWidth": 100,
  "arrowParens": "avoid",
  "useTabs": false,
  "tabWidth": 2
}
Here we're doing the following:
- Setting semicolons to false.
- Denoting the use of single quotes for text when possible.
- Setting a line length of 100 characters.
- Avoiding the use of parenthesis in arrow functions when they're not needed.
- Replacing the tab character with 2 spaces.
To test it we can run the next command:
npx prettier --config .prettierrc --check .
Husky and lint-staged
It's time to set up our git hooks with Husky and lint-staged, we're going to initialize our project with git and see the status using the next command:
git init
Then, lets install Husky:
npx husky install
Now, we're going to create scripts to execute our linter and two Prettier actions, write and check, in addition to the lint-staged instructions in our package.json:
{
  ...
  "scripts": {
    ...
    "lint": "eslint \\"./src/**/*.ts\\"",
    "prettier:check": "prettier --config .prettierrc \\"./src/**/*.+(js|json|ts)\\" --check --ignore-unknown",
	"prettier:write": "prettier --config .prettierrc \\"./src/**/*.+(js|json|ts)\\" --write --ignore-unknown"
  },
  "lint-staged": {
    "./src/**/*.+(ts|js)": [
      "npm run lint",
      "npm run prettier:check"
    ]
  }
}
To run these scripts whenever we do a commit we have to create the pre-commit hook and include the execution of lint-staged, we can do it with the following command:
npx husky add .husky/pre-commit "npx lint-staged"
And that's it, whenever we want to create a new commit our lint and prettier:check script will be executed and in case of errors we can use the prettier:write script to fix them.
Testing
For test we'll need a few dependencies:
npm i -D mocha chai supertest @types/mocha @types/chai @types/supertest
Dependencies:
- Mocha: JavaScript test framework.
- Chai: JavaScript assertion library, can be combined with any other testing framework.
- Supertest: HTTP assertion library.
The rest of the packages are types of the already mentioned packages for TypeScript.
Then, we're going to make a few modifications to our app file in order to test it, we'll leave the logic in our app.ts, but the server in a file called server.ts:
import express, { Request, Response } from 'express'

const app = express()

app.get('/', (req: Request, res: Response) => {
  res.send('Hello world')
})

export default appimport app from '~/app'
app.listen(3000, () => {
console.log('listening on port 3000')
})
Note: We have to sustitute app.ts for server.ts in our nodemon.json and scripts in the package.json as well.
Note that we're using our customized path ~ instead of using the relative path. To configure tests, we're going to create a folder called test inside src and we'll create a test file for our app:
mkdir src/test
touch src/test/app.test.ts
In our app.test.file file, we'll add the following:
import request from 'supertest'
import { expect } from 'chai'

import app from '~/app'

describe('App', () => {
  before(done => {
    app.listen((err: unkwown) => {
      if (err) return done(err)
      return done()
    })
  })

  it('works properly', done => {
    request(app)
    .get('/')
    .expect(200, (err, res) => {
      if (err) return done(err)
      expect(res.text).to.be.equals('Hello world')
      return done()
    })
  })
})Here, we're using the before hook to check for any errors in our app, and then we're creating a test called “works properly" which tests our / path expecting a 200 status code and res.test to equal 'Hello world', it's important to return at the end of the test otherwise Mocha will throw an error. All that remains is to execute our test, to do that we're going to add the next script to our package.json:
{
  ...
  "scripts": {
    "test": "mocha -r tsconfig-paths/register -r ts-node/register  \\"./src/test/**/*.ts\\""
  }
}Here we're telling Mocha that we're going to require ts-node and tsconfig-paths:
- ts-node: first we need to compile our typescript code, so with ts-node/register we're specifying which files we want add to the TypeScript compiler.
- tsconfig-paths/register: Using tsconfig-paths/register we're resolving our paths and modules in order to be executed.
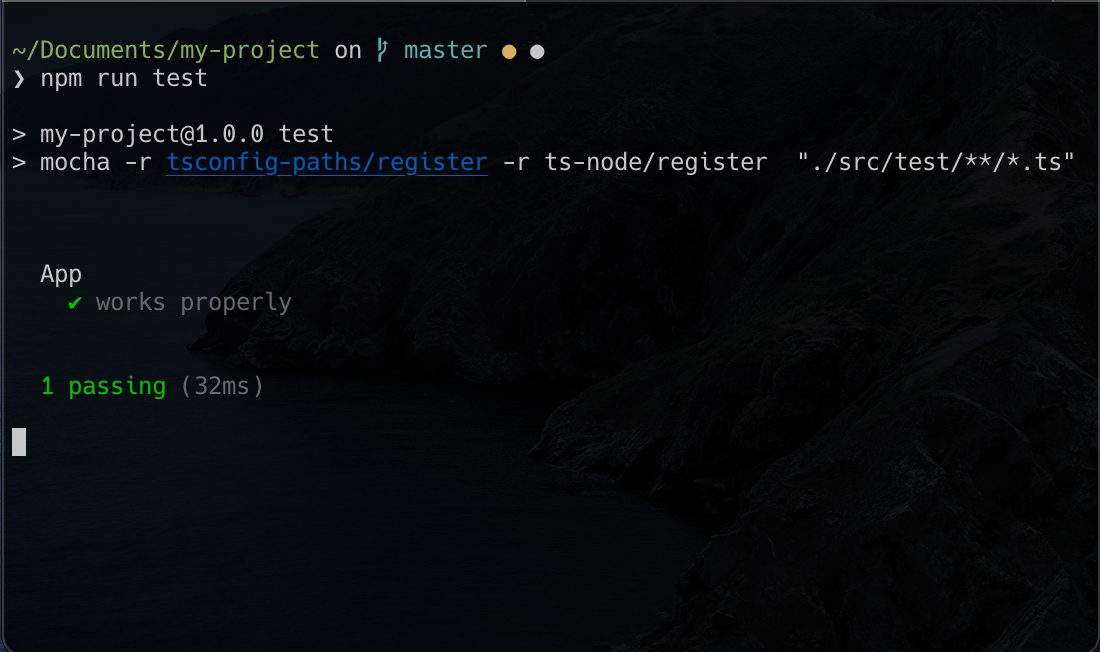
And that's it :), that's how we can setup a TypeScript project with tests, if we execute this command, our test should pass:
View Comments